|
Purpose
The purpose of this activity is to demonstrate trait expression and how traits are passed from one generation to the next. Students will practice corn breeding techniques and use Punnett squares to predict the phenotypes and genotypes of offspring and their parents.
Objectives (Year 1)
Following completion of this lesson, the students will:
-identify the parts of a corn plant and how they reproduce.
-explain the process of corn breeding.
-demonstrate how traits are passed to offspring
-identify what gametes are and their importance in sexual reproduction.
-define DNA, genes, alleles, and chromosomes and explain their function in controlling and passing on traits.
-explain how genes control traits, i.e. seed color.
-identify the genotype and phenotype of an organism.
-differentiate between dominant and recessive alleles
-differentiate between homozygous and heterozygous genotypes
Objectives (Year 2)
-predict the phenoptypic and genotypic ratios of offspring
-determine the genotype of parents based on observations of offspring.
Materials
1. Seed for bicolor (yellow and white) kerneled sweet corn. Available at any garden store.
2. Soil
3. Flower pots (12” or larger)
4. Fertilizer
5. Water
6. Warm sunny location (a greenhouse is optimal)
7. Small paper bags
8. Stapler
9. Marker
10. Worksheet
Year 1
Methods
1. Fill pots with soil up to 1” from the top of the pot. Plants may also be grown outside in a field setting. Check seed packet for specific planting instructions.
2. Poke 1 hole in soil in center of each pot approximately 1-1˝” deep (read seed packet for exact depth).
3. Drop one seed into each hole.
4. Gently cover seeds with soil.
5. Record the date the corn was planted for completing the worksheet.
6. Water seeds until soil is moist
7. Allow plants to grow for several weeks fertilizing as recommended on fertilizer container. Water regularly (when soil is dry).
8. The rate of plant growth directly depends on the temperature of its environment. Corn needs a certain number of days to reach maturity, and this is based on how much heat the plants get. Warmer conditions may speed up plant growth and shorten the number of days necessary. Similarly, cooler conditions can lengthen the season. Check the seed packet when purchasing, and try to choose a variety with the shortest growing season to decrease the time it takes to complete the experiment.
9. Allow plants to grow to maturity.
When to pick corn:
After the plants begin to tassel, watch for when approximately half of the plants are showing silks and record this date. The field will be ready to pick about 18-22 days after the half silk date, depending upon temperature conditions (source: Earl May Flower & Vegetable Guide 2002). Kernels should be juicy yet firm.
***NOTE: If you plan to continue the experiment for a second year, or would like to be able to plant some of the kernels harvested, allow plants to reach full maturity before harvesting. The stalks should be dry and brown and kernels will be hard.
Analyzing observations:
Give each student or student group an ear and have them score and record the data using the worksheet provided.
Discuss observations and results.
Year 2 (optional)
Follow planting instructions outlined for year 1.
Label each pot (or row if planted in a field) as to whether the seed planted was yellow or white. Make sure the labels stay with the plants throughout the entire season.
Corn Breeding:
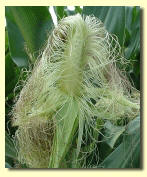
After several weeks (time depends upon the corn variety) you will notice an ear shoot developing about halfway up the side of the plant. Cover the tip of the ear shoot before any silks emerge to prevent self-pollination. You will also notice a tassel beginning to emerge from the top of the plant.
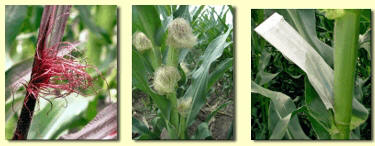 |
| Silks from the ears emerging from the side of the corn plant. Try to cover the ears with small bags before the silks even begin to emerge to prevent self-pollination.
|
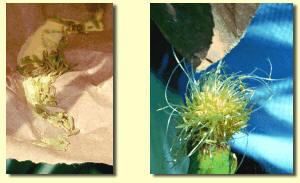
Once the tassel begins to shed pollen place a paper bag over the tassel and grip/fold it closed over the base of the stem of the tassel to collect any pollen that falls within the bag. Shake the bag vigorously to loosen any remaining pollen from the tassel. Carefully bend the top of the stalk over and remove the bag of pollen.
*The silks must be ready to pollinate (emerging from the ear). If they are not ready when the tassel begins to emerge, put a bag on the tassel to collect any pollen that falls. Staple the bag closed around the base of the tassel to keep the pollen within the bag and wait until silks are ready. When the silks have begun to emerge, shake the tassel bag to remove remaining pollen from the tassel and dump the bag of pollen onto the silk as outlined in the next step.
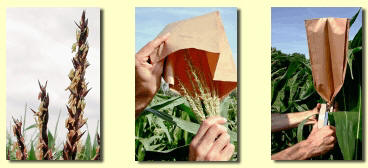 |
| As the tassels emerge, cover them with paper bags and close the bags at the bottom to collect any pollen that falls.
|
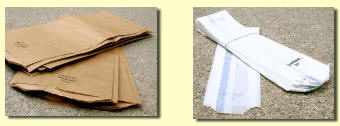 |
| Brown tassel bags and white silk bags. Small paper grocery bags can be used for tassel and silk bags.
|
Three different crosses can be made to demonstrate the possible results.
Cross 1: yellow X yellow (self-cross)
Cross 2: yellow X white (out cross)
Cross 3: white X white (self-cross)
Determine the plant to be pollinated, remove the bag over the ear (silks should be at least partially emerged from the ear) and pour the pollen from the bag on the silks. Place the pollen bag on the ear and staple the base shut to protect the ear from being contaminated with other pollen. Write on the bag what cross was made (yellow X white).
For plants that are self-crossed or self-pollinated, pour the bag of pollen on the ear of the plant it came from. Label the plant as such. (yellow X yellow)
Continue to grow the plants to maturity.
 |
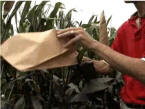
| When the silks have begun to emerge from the ear shoot, it is time to pollinate. Shake the tassel bag to dislodge as much pollen as possible. Remove the bag from the tassel and then remove the silk bag. Pour the pollen from the tassel bag onto the silk. Then cover the pollinated silk with the tassel bag and secure the bottom closed. This will prevent pollen from other sources from contaminating the cross. Using a marker, label the bag on the silk with the phenotype of the parents that were crossed.
|
 |  |
| Each tassel is attached to an egg. If a pollen grain lands on the tassel, a tube will grow in the tassel to the egg and deliver the genetic material. The eggs are now fertilized and are now embryos or kernels. | View a movie demonstrating breeding
streamed video may take
several minutes to load |
When to pick corn:
Follow harvesting instructions for year 1
***IMPORTANT: label each ear with the cross that was made (the parents that were mated to make this offspring). A piece of masking tape wrapped around the ear with the cross written with a permanent marker works well.
Analyzing observations:
Give each student or student group an ear from each cross and have them score and record the data using the worksheet provided. Students should complete the the Year 2 section of the breeding lesson worksheet. Students and teachers should compare the predicted results with the observed results from the breeding exercise.
Additional Articles for Review
National Corn Growers Association – Education resources
http://www.ncga.com/education/guide/guide.html
Nebraska Cooperative Extension http://www.ianr.unl.edu/pubs/insects/nf425.htm NF00-425 Revised November 2000.
Assessment
Students are assessed based on participation in the experiment and adequate completion of the worksheets.
|